Walkthrough: Getting Started Guide for Owners / Managers
This walkthrough is aimed at Business owners / managers – the person who initially signed up for Chklsty (we call them OrgReps, Organisation Representatives).
Follow along in your Chklsty instance to get set up and running! You can watch the 6-minute video, or read the text below if you prefer.
Set up some Roles
A User is someone you, as the Organisation Representative (OrgRep), adds to Chklsty and who uses checklists day to day.
Typically these are the staff on the floor of the business – the receptionist, the bookkeeper, sales associate, and so on (but they can also be yourself, and other managers in the business – or contractors).
Roles control which Checklists a User can start using. Both Users and Checklists are assigned to Roles. For example:
Steve runs a bookshop, with six staff. Two of his staff, Josh and Anna, are more senior so are trusted to close up the store at night. Steve creates the Role Store closer upper in Chklsty, and assigns Anna and Josh to that Role.
When Anna or Josh log in to Chklsty, they see they can start a new checklist “Close up store”, because they are assigned to the Store Closer upper Role. Other users who are not assigned to that Role, cannot see that checklist.
When making Roles, consider that this could be a specific role (eg, “Receptionist”), a department (eg, “Sales”), or a function (eg, “Newsletter sender”).
A User who is assigned the role “Receptionist” will see all the Checklist Blueprints assigned to the “Receptionist” Role.
Roles are for convenience in organising many checklists for Users. You may wish to only have one Role in the system, if you don’t have many Users or Checklist Blueprints. Later, you can expand your usage of Chklsty, and use the Roles function more.
A Checklist Blueprint can have any number of Roles assigned to it, and any number of Users can have any number of Roles – it’s a “many to many” relationship.
Org Reps can add, edit and delete Roles for Users and for Checklist Blueprints at any time.
▢ Do it: Create at least one Role for your organisation now (Admin menu, Roles, Add Role). Be sure to add yourself to those new Roles.
There’s a bunch of help text on that page to guide your decisions, and nothing is set in stone – it can all be edited later. ?♀️
Make a simple Checklist Blueprint
With at least one Role created, we can now make a Checklist Blueprint.
Checklist Blueprints are the core of Chklsty.
They are the “master copy” of a checklist that you (as an Org Rep) create and edit to suit the business process. Over time, it’s likely you’ll create dozens of Checklist Blueprints – they’re ideal for tasks in the business that happen over and over again.
Every aspect of the Checklist Blueprint you make now can be edited later, so there’s no need to worry about being “locked in”. You’ll often tweak Blueprints to suit your business, especially when starting out with Chklsty. You may choose to delegate Blueprint editing to other staff (managers, or trusted employees).
For this guide, we recommend your first checklist has at least five items on it.
▢ Do it: Create a checklist for a simple, repeating task in your business (Admin menu, Checklists, Add Checklist Blueprint). Be sure to assign the new Role you made, to this checklist.
There’s a bunch of helpful contextual info on the page itself. To experience some of the aspects of how Chklsty works, we recommend:
- Choosing a task that can actually use this checklist in the near future
- Setting all items in the checklist to be for the same one Role
- Allow attachments
- Setting some items as “Comments Required”
- Adding a Separator between two checklist items, just to see how sections look
- Add some Notes to some checklist items, and style them using Markdown
Preview the checklist
At any time when making a checklist, you can save and test it, to see how it will look for Users. Click the “Save and Preview” button at the top of the Checklist Blueprint editing page.
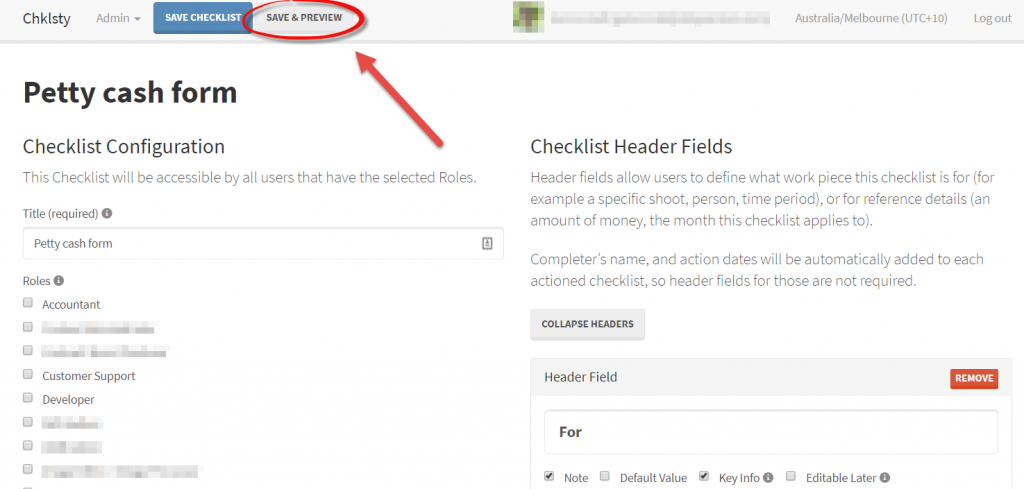
▢ Do it: Preview the checklist you just made. Fill in the header items. Check off some options.
If nothing happens when previewing, you may need to allow popups, as the Checklist Preview will open in a new tab. This is an icon that appears in the address bar.
in the preview, if you see room for improvement, switch back to the Checklist Blueprint editing tab, make the changes, the click “Save and Preview” again.
Note that Previewed checklists cannot be actually submitted – that can only happen when the Checklist is started for real, by a User – we’ll do that next.
Actually complete the new checklist as a User
Chklsty works in a predictable way, so this is not always necessary (but is always possible).
But, as this is the first time you’ve used Chklsty, it’s good to see what your staff will actually experience so you can support them.
▢ Do it! Follow these steps:
- Confirm that you’re a member of the Role this checklist is assigned to
- Navigate to the User-facing aspect of Chklsty, the Chklsty Dashboard – click the Chklsty logo top left
- Stop thinking like a manager or business owner for a bit – put on your “Employee” hat for this
- Start the new checklist you made
- Fill out the header items – with junk info is fine for this test
- It’s possible that you see some issues that need improving in the Blueprint already! It’s no problem to open a new tab and edit the Checklist Blueprint as you do this. After saving changes, you’ll need to reload the user-facing checklist page to see the changes.
- Start the checklist for real – “Save headers and continue”
- Practise the checklist actions that can be made
- One click: Mark off this item as done
- Two clicks: Mark this item as NA (Not applicable)
- Three clicks: Mark this item as Not Done
- Submit and sign the completed checklist
- If you set up your own user account with a signature, that will be applied here, otherwise, your name will appear in cursive script
- Checkout the resulting PDF file generated
You’ve just submitted your first checklist. This is what you staff will do each time this task needs to be done in your business.
Add some users
At least one practical Checklist Blueprint has been made, tested, and tweaked. We have Roles. So now we can add some Users!
Users are the staff, the people who do the day-to-day work in the business – the Receptionist, Bookkeeper, Sales Associate, Marketing Manager, etc. Chklsty is free for the first few users, and we encourage you to use the free tier to ensure Chklsty is right for your business.
▢ Do it: Add some new users. Admin menu, Users, Add User.
As before, there’s a bunch of help info on that page.
Below, we have some proposed text for an introductory email to new Chklsty Users. You may wish to copy this, edit it to suit, and send to each user you have set up in Chklsty.
SUBJ: I’ve set you up in the new Chklsty system
Hey ,
I’d like to trial using Chklsty in our business. It’s an online checklisting system that replaces paper / Excel checklists for an all-online system. I’ve had a play with it and set some stuff up for us, and I think it’ll work well.
I have set you up an account for it, and you should have a welcome email from them now, where you can set a password. A reminder to add this to your password manager now!
When you log in, there’s a bunch of help info around the site, and there’s also an introductory guide for you as a Chklsty User at http://hello.chklsty.com/help-and-support/walkthrough-getting-started-guide-for-users/. Please take 15 mins this week to read that and have a play? Then, I’d like you to start using it for the tasks you do each day.
It’s new, so there’s likely to be some issues. Let me know what they are, and together we’ll get them fixed. Once we have trialled it for a few weeks and made some tweaks, we’ll assess if it’s right for us, and perhaps expand its use elsewhere in the business.
When will you be able to read the intro guide?
Thanks
ABOVE: Example email template for Owners to copy and paste into an email to send to Users. We recommend filling in the variables, and making sure it all applies to your business!
We recommend reading the intro guide for users, or at least skimming it – we make some “political” statements there in an effort to encourage employees to embrace the checklisting lifestyle. We wrote this based on experience running small businesses with 5 to 40 employees. As a manager of people you probably agree with our approach, but if not, you may need to clarify that with your employees.
Where to from here?
That bring us to the end of the Getting Started Guide for Owners / Managers. To recap, you learned how to:
- Add new Roles
- Make a basic Checklist Blueprint
- Tested the Checklist Blueprint, as Preview and for real as a User
- Added new Users
You might want to add some more Roles, Checklist Blueprints, and Users now, or just test it at small scale for a few weeks.
We have a FAQ to address some of the common questions we get, some Walkthroughs (like this one) for other tasks, Case Studies to see how others are using Chklsty, and of course you can contact Customer Support. We’ll respond in one business day at most.
We regularly post articles on our blog about checklists (not always specific to Chklsty), that you might want to check out.
We send a newsletter out every few months that you might want to subscribe to, where we highlight some useful Checklists our Clients have made, and discuss new features we’re adding to Chklsty.
We hope you find that Chklsty is enjoyed by your staff, and it helps reduce some friction in your business. Let us know how it works for you?
Oh wait… consider making some policy decisions regarding Chklsty
It’s early days, and it’s not necessary to decide these things yet, but your Users might ask you about them. It’s fine to skip this section if you’re busy – you won’t miss anything super-important at this early stage. There are three things to consider:
- Set an internal policy on Teams accessing each others checklists
- Decide what to do if a checklist cannot be completed (archiving)
- Decide on definitions of “Done”, “NA” and “Not done”
Set policy on Teams accessing each others checklists
Chklsty considers users who have the same Role to be on the same team, and allows people to look at, and perform actions on each others checklists. For example:
Anna starts work on the Monthly newsletter (and associated checklist!) at Steve’s bookstore where she and Josh work. She gets half way through the newsletter but then it gets busy… then she feels sick, so heads home early. Turns out she’s got the flu, and is out for the whole week!
The newsletter deadline would be missed, so the boss, Steve, asks Josh to finish the newsletter. Josh opens the checklist Anna started, and keeps working on the newsletter, starting where Anna left off.
Another more social example:
Anna and Josh are both working late at the bookstore. While the Steve the Owner assigned the close-up duties to Anna today, Josh and Anna are both trained to do it. They’re going out for a drink together afterwards, so Josh helps Anna do some of the close-up store tasks.
Anna starts the Checklist on her phone and starts doing the tasks. Josh opens Chklsty on his phone, sees the checklist Anna just started in “Your team’s checklists”, and opens it. In real time, he can see what Anna has done, and starts doing some other items. Anna sees what Josh has done in real time. Together, they complete the duties in half the time.
This sharing feature is generally a good thing, but you may prefer staff do not do this, or only do it under certain circumstances (for example, when approved by a manager). Chklsty allows this regardless (for Users who share the same Role), so you’ll need to chat with your staff directly about your preference here.
Decide what to do if a checklist cannot be completed – archive it?
Of course, most business owners and managers prefer staff complete tasks they are assigned and by default, Chklsty does not allow an incomplete checklist to be submitted… but sometimes that simply cannot happen. For example:
Steve has a “Setting up a new corporate client” checklist. When a business contacts him and wants to buy bulk orders of books on an account (to be invoiced at the end of the month), he wants to make sure they can pay their bill, so there needs to be some credit checks done, as well as forms signed, and the client needs to be added to a marketing mailing list, and some administrative setup done (clearly, a checklist is ideal for this!).
All these tasks can take up to a week, and sometimes prospective clients starts all enthusiastic, but then change their mind halfway through the setup process. That’s annoying, but we have all experienced something like it. But what happens to the checklist in Chklsty? It’s annoying for staff to click “NA” on each remaining item, especially if there are dozens of items left.
Each Checklist Blueprint has a “Allow submission if incomplete” option. When checked, users can stop a checklist “whenever” and submit it so it’s not cluttering up their list of checklists to complete.
We consider this an “Archived” checklist (being archived infers it’s incomplete).
You may wish to set some policy around this (in the User training resources we provide, we mention this as being a possibility, and that you as the Org Rep should be consulted). Of course, you can choose which checklists this is possible on, but the specific circumstances might need to be discussed face-to-face.
Decide on a definition of “Done”, “NA” and “Not done”
Checklists in a business can be incredibly helpful for improving quality and reducing missed tasks or mistakes, but they’re only as good as the checklist designed by the Org Rep, and the Users using them (we’re always happy to offer advice on checklists you’ve made).
When Users are actioning checklists, they can set one of three options for each item:
One click: Mark off this item as done
Two clicks: Mark this item as NA (Not Applicable) in this case
Three clicks: Mark this item as Not Done
While these are superficially self-explanatory, in our experience there is some wiggle-room. We encourage a discussion between you and your staff about the definitions that suit your business internally. Some considerations include:
- Specifically when should an item be marked off as being done? (before they start on it? After they have started, but before finished? Only when it’s actually finished?)
- What is the “definition of done”? (Perhaps some sort of detailed procedure document defines this? Or just “Common sense”?). This can be controlled by the wording of the checklist item to a large degree
- What if an item is done, but someone or something “un-does” it (or, it was done wrong)?
- What are some circumstances when this item is not applicable? Should that be defined in a note for that item on the checklist?
- When is it acceptable to mark an item as “not done”? Should something else happen if that occurs – notify a manager?
Return to Help and Support centre.